How to Make Fried Marble Necklaces
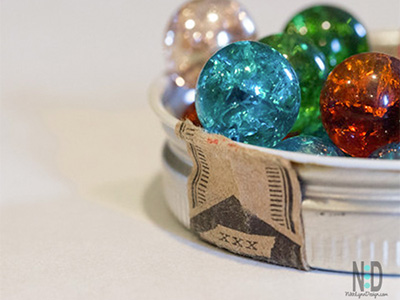
How to Make Fried Marble Necklaces These are inexpensive yet extremely elegant necklaces made by baking and internally cracking ordinary marbles. Make up a few as gifts or for your next hot seller at a craft fair. Either way, you will receive rave reviews and plenty of wonderful compliments.
May I Have Your Attention, Please?
At my first craft show back in 2001 I owned a fused glass business, I made up 100’s of necklaces to hang around the craft booth. What was only made to be an attention-getter, quickly became my number one seller.

It was my great-grandmother that taught me how to make these necklaces. We used a cast iron pan in her home to create the necklaces. I just experimented until I achieved the same crackling look by using what I had on hand.
Difficulty: Easy
Things You’ll Need:
Pie Pan or Muffin Tin
1 Bag Of Marbles (Purchase Here)
Bowl Of Ice Water
Oven
Jewelry Bell Caps (Purchase Here)
E6000 Glue (Purchase Here)
Jewelry Jump Rings (Purchase Here)
Necklace (Purchase Here)
2 Pairs Of Needle Nose Pliers (Purchase Here)

Instructions For Making Marbles:
1.) When you purchase your marbles, purchase any regular, one-color, or cat eye marbles. If you use a two-tone color marble the marbles will not get a crackling appearance, instead they will just crack in half. You may also use flat-back marbles
2.) In a medium size, metal bowl place 3 cups water and five ice cubes. For each batch of marbles that you fry be sure to replace the ice cubes. The marbles need to go from a fire, hot oven right into freezing, cold water in order to create the crackling effect.

3.) Place marbles in a metal pie pan or muffin tin and place them in a 500-degree oven for 20 minutes to heat them thoroughly. There might be a few that will crack in half while you are heating them. This is O.K. and perfectly normal.

4.) Remove the marbles from the oven after 20 minutes. Pour them directly from the pie pan into the ice-cold water. Let them cool for about a minute. When you remove the marbles from the water you may find some have broken, if they do just throw them out. It’s the marbles that are intact but have a crackling effect inside and out that you are going to use for the next step.

Instructions for Attaching Bell Cap Bails:
5.) Use E6000 glue to glue the bail onto the marble. Let the bail completely dry before adding the jump ring. See link above to purchase the bails. I searched far and wide for this vendor, she is the only one that carries them that I have found.
6.) Place the jump ring in your left-hand pliers, holding the ring’s left side with the split side up. Take your pliers in your right hand gently grasp the right-hand side of the jump ring and push backwards to open it.

7.) Slip the bell cap hole in the split ring. Place the necklace inside of the opened split ring. Be careful that the necklace does not go into the bell cap hole, just the split ring should be in the bell cap.

Then use both sets of pliers, one on the right-hand side of the split and one on the left hand of the split to gently rock the ring back and forth, moving it closer to closing the split ring gap.

You are welcome to mention me or link to my website but the information and pictures are copyrighted. I’ve just updated my pictures once AGAIN. Please do NOT post them on your websites, this go round I’ll charge you an image license fee – PROMISE.
Posts may contain affiliate links.




Edna Harvilicz
September 3, 2011 at 10:53 PMWONDERFUL Post. Thanks for sharing.
jewelry stainless steel
September 16, 2011 at 9:18 AMI am including this RSS to my email and can look out for much more of your respective fascinating content.
Marina
September 22, 2011 at 2:18 PMYou have really interesting blog, keep up posting such informative posts!
Блог о путешествиях
September 27, 2011 at 3:12 PMThx for this great information that you are sharing with us!!!
тайланд визы украина
October 5, 2011 at 3:17 AMSimple but interesting blog post I must say. I’ve just added your RSS to my google reader! =)
free unlimited hosting
October 7, 2011 at 2:54 PMI like this site because so much useful material on here : D.
buy flexeril online
October 14, 2011 at 10:49 PMThank you for this information! =)
Hello Kitty
December 13, 2011 at 11:26 AMUseful piece of information. Thank you for sharing.
Lightbody
December 16, 2011 at 7:49 AMYour website has some of the best mix of content that I have visted lately. I am very blown away by the design layout on your blog. The logo is extremely eye-popping and goes hand in hand with the theme! You officially have a fan! 🙂
Celeste
December 18, 2011 at 1:25 AMHave you thought about making a video on this?
Nikki Lynn Design
December 19, 2011 at 1:05 AMI never thought about making a video. I can though. I just made up a new batch last night. After Christmas I will make one and post it for you 🙂
Monica
September 24, 2012 at 1:24 PMwhere do you get the marbles from? All I can find are plain clear ones or glass gems.
Nikki
October 2, 2012 at 2:55 AMMonica, Please see the scrolling pictures below the posting. If you click on the marbles you will be brought right to the page. It is getting more difficult to find them in town. I have expanded to the internet for my outlets.
Wendy Behrenwald
December 19, 2011 at 11:40 PMThanks for the details. I agree with another poster, I’d like to see a video too.
Amber
January 5, 2012 at 12:47 AMDo you do any other colors? I would love to have a purple one, just don’t think I could pull it off myself.
Nikki
January 8, 2012 at 10:20 PMCurrently, I have in stock following color: white, peach and green. I’ll look for additional colored marbles in Febuary and make up a few more batches. Just keep an eye on this post and see what I find 🙂
splendidwonders
January 5, 2012 at 3:32 AMA friend of mine recently told me about the fun time she had in making these. And thanks to her Pinterest, I found the original link which you can find right here at Nikki Lynn Design. Here is a link to my article:http://splendidwonders.wordpress.com/2012/01/04/how-to-make-fire-roasted-marbles/
Crafty Cassie :) by casheartsu - Pearltrees
January 9, 2012 at 8:16 AM[…] Don’t wish to make one of your own? Purchase one of mine. $5.00 per necklace and $3.00 shipping from my Wisconsin home. Shattered Marbles $5.00 » How to Make Fried Shattered Marble Necklaces Nikki Lynn Design […]
Crystal
January 9, 2012 at 9:25 AMMy mom had a crackle marble when i was little..i always wanted to see her jewelry box so i could look at it. I think she told me it was boiled,i am excited to show her this tutorial..thanks so much!!
Garnie
January 15, 2012 at 1:49 AMThank you for bringing back to memory a joyful time. My grandmother taught me this when I was about 10 years old. Back then we just crackled marbles for fun. Now I can use them in my jewelry making. Thank you again. And I enjoyed your tutorial. Very easy to follow.
Jolene
January 27, 2012 at 9:12 AMAbsolutely beautiful, now I have to raid the back shed to see if I have my childhood marbles in storage. One question, I don’t have a kiln, only a kitchen over that goes up to 250 degrees celsius. Will that still work????
Although it’s so bloody hot here in Perth, Australia, (42 degrees) I’m sure I can just put them outside for a while 😉
Nikki
January 27, 2012 at 8:12 PMTo Jolene: Your oven will work just fine :). Just leave the marbles in the oven a little longer, so the core temp be heated properly, and be sure that you have ice cold water to plunge them into straight from the oven. Remember, you can repeat the process again if you do not get the results you want the first time.
Cheryl McClure
February 2, 2012 at 12:12 PMWhen do you glue the bail on to the marble? Before you connect the jump ring to it? I remember seeing marbles that were heated or I just saw them as a child, can’t quite remember. I would love to do this with my grandchildren. Thanks a lot of this info, that I had forgotten about. I love making all kinds of jewelry.
Nikki
February 6, 2012 at 2:05 AMCheryl, I normally glue the bail on first and then add the jump ring after the bail is dry. This will keep the bail from sliding with the weight of the jump ring. Once the bail is set, you will not have that problem.
allie
February 3, 2012 at 10:37 PMWhat kind of glue or epoxy do you use to attach the marble to the bell cap?
Nikki
February 6, 2012 at 2:03 AMAllie, I use E6000 glue because it holds to glass. It can be found at any discount or craft store.
Pinterest Night and the Beginning of a Modge Podge Addiction « The Angry Homemaker Blog
February 4, 2012 at 10:08 AM[…] found on Pinterest, and we decided ahead of time that we were going to make homemade coasters and cracked marbel necklaces as our crafts, because we had to buy the supplies first (check out the links above for your […]
How to fry marbles and then transform them into jewelry · Recycled Crafts | CraftGossip.com
February 18, 2012 at 11:17 AM[…] Here is a cool tutorial on how to fry marbles. Why you ask would you want to fry marbles? Because when you do they crack and look crystallized. The tutorial over there includes directions on how to turn the marbles into jewelry using bell caps, but if you are more into wire wrapping pop on over here to see a tutorial on how to make a marble float in an old earring. […]
Casey
February 26, 2012 at 8:01 AMI love these. I have made some just for myself but I can never find the color marbles I want. Where could I find more different colored marbles?
Jolene
March 5, 2012 at 9:31 AMMe again, did it, it worked brilliantly, no breakages. On;y one problem, I got some dark scorch marks on a couple of marbles. Would baking paper or alfoil (I guess thats’s alumininum foil to you guys!) prevent this?
Jacqui
March 17, 2012 at 3:19 AMHi! I live in Florida and I would love to order a few of these to use as part of my bridesmaids’ gifts! About how long do you think it would take to ship them? Do you have all of the colors in stock? Thanks : )
Nikki
March 25, 2012 at 2:59 AMSent you an email. Check your inbox.
NeCharlie
April 3, 2012 at 6:19 AMI’ve looked everywhere for different colored marbles and I can’t find them, where can I buy different colored marbles on-line??? please response :)))
Nikki
April 3, 2012 at 8:23 PMI currently purchase all my marbles from a local craft store. It is not a chain store.
Penny Holder
March 19, 2012 at 9:24 AMWhat size bead cap do you use???
Nikki
April 3, 2012 at 9:04 PMYou can use any of the ones that are listed in the 2nd set of scrolling pictures located in the article. You don’t have to purchase them from here but that is a good supplier and the only one I know of right now.
Kristin
March 30, 2012 at 12:56 AMI have been looking everywhere for the bail caps… Any clue where I can find some?
Nikki
April 3, 2012 at 8:24 PMUse the scroll picture bar on this page. I have included a supplier on Amazon.com that carries them 🙂
Happy Is The Man That Hath His Quiverfull Of Them « Aunty Bears Blog
May 7, 2012 at 8:06 AM[…] “Lo, children are an heritage of the Lord: and the fruit of the womb is his reward. As arrows are in the hand of a mighty man; so are children of the youth. Happy is the man that hath his quiverfull of them.” (Ps. 127:3–5.) […]
Katie
June 5, 2012 at 8:09 AMAh man, thank you so much for supplying a link to bail caps. I’ve been trying to locate some forever… for this very project.
Nathilee
June 11, 2012 at 1:49 PMI must thank you for the efforts you have put in writing this website.
I love all your high-grade content how to dos. This made a cheap but appeciated gift to many of my family members.
How to Make Cracked Marble Necklace « Teens On Dimes
June 17, 2012 at 1:10 PM[…] can see her entire write up of how to make them here: https://www.nikkilynndesign.com/2011/01/how-to-make-fried-marble-necklaces.html/ She also placed a link to her how to video on YouTube as well. Tweet(function() { var po = […]
Lesley
June 27, 2012 at 8:12 AMI love these necklaces and want to incorporate these in to our girls camp this year. I am having difficulty finding the bell caps that you use. What size do I need and where can I get them? Thank you
Nikki
July 7, 2012 at 1:07 AMPlease see the scrolling picture box on the bottom of the tutorial. The small siver pieces are the bell caps and if you click on the picture it will bring you to a supplier. I don’t carry them.
Shelly
July 30, 2012 at 6:26 AMHi, will this work for round glass beads as well or does the hole through it make it too weak to withstand the temperatures without breaking? Also, what sizes of marbles will this work for, i.e. will it work on the large player size marbles (16mm)? Thanks very much for posting this, I have a tendency to injur myself when I experiment so I thought I’d ask these questions.
Nikki
July 30, 2012 at 7:20 AMShelly, I have tried this method with round glass beads with a hole in the middle. Most split in half. The ones that make it through the process, I kept for 5 months. Almost every one of the beads ended up breaking in half or crackling. I use 8-10 mm marbles when I make my necklaces. The marbles that do not crack during the process, have not cracked afterword. I have not done used any marble past 10mm. I would believe 16mm marbles would work. Just remember you might need to leave the marbles in the oven a little longer because of the extra size. If you do not get the crackling effect you want after cooling in ice water put them back in the hot oven, straight from the ice water. They should crackle within the first minute. If that happens and you get the effect you want, do not place them back into the ice water.
Shelly
July 30, 2012 at 11:57 PMThank you so much Nikki!
Jodie
August 1, 2012 at 8:22 PMGreetings! I know this is somewhat off topic but I was wondering if you
knew where I could get a captcha plugin for my comment form?
I’m using the same blog platform as yours and I’m having
problems finding one? Thanks a lot!
Nikki
August 1, 2012 at 9:16 PMYou will have to download from the web and then upload to WordPress. Here is the link: http://wordpress.org/extend/plugins/captcha/
Victoria
August 8, 2012 at 12:56 PMI live in New Zealand and I can’t find the right kind of marbles anywhere for a cheap enough price. 🙁
Nikki
September 22, 2012 at 12:24 PMVictoria,
I suggest using the scrolling picture box at the bottom of the blog post. The pictures of the marbles can be shipped direct to your home. Plenty of colors to chose from.
Nikki
October 2, 2012 at 2:57 AMIn the scrolling picture box on the page, right under the directions….click on the picture of the marbles. It will bring you to an online source.
Victoria
August 10, 2012 at 2:52 PMI found some plain coloured marbles after a lot of searching, but sadly they are all a dark blue which doesn’t turn out as well. I suggest using lighter colours instead.
Carol
April 17, 2013 at 9:12 AMThese are beautiful, Nikki! Have you tried using fishing line to give it a “floating” effect? I think that would be quite lovely. I used to buy “floating” diamonds and wear them (not real diamonds, of course), and they are really pretty; especially when you have a tan. I’d like to have some of these, but with the “invisible” chain. Thanks!
Carol
DIY Friday – Fried Marble Necklaces | Bellissima Kids | Children's Design, DIY Crafts, Kids Fashion, Traveling with Kids, Coolhunting
April 11, 2015 at 9:08 AM[…] by this idea and it is so, easy! You literally bake marbles. Here is the full method to make your Fried Marbles. Have a beautiful weekend. Jeanne […]
Cool Form Design |
February 18, 2016 at 10:40 PM[…] How to Make Fried Shattered Marble … – Hi, will this work for round glass beads as well or does the hole through it make it too weak to withstand the temperatures without breaking? Also, what … […]
Nikki
April 27, 2016 at 12:30 AMI have never tried it with a hole in the bead to tell you the truth. I would “think” it would make the bead hole too weak.